Lawn Mower Tire and Wheel Maintenance Guide
Master DIY lawn mower tire and wheel maintenance with safe, step-by-step guidance on inspection, removal, installation, and troubleshooting to keep your mower reliable all season.

Learn how to inspect, service, and replace lawn mower tire and wheel components to restore traction and safety. This guide covers sizing, removal and installation, quick fixes, and routine maintenance. By following these steps, homeowners can avoid downtime and costly repairs, from checking tire pressure to balancing wheels and selecting the right replacement tire.
Understanding lawn mower tire and wheel basics
According to Mower Help, the tire and wheel assembly is the interface between your mower and the ground, absorbing shocks and carrying the load across uneven turf. The tire, bead, rim, hub, and axle work together to provide traction, steering, and stability. In this guide we’ll explore the anatomy of common tire configurations, why tire type matters (tubed vs tubeless, pneumatic vs solid), and how wear patterns signal when to repair or replace. Understanding these fundamentals helps homeowners diagnose issues early and prevent downtime. Start by noting the tire’s tread depth, sidewall condition, bead seating, and any cracking or bulging around the rim. A damaged bead can cause air leaks or sudden deflation, while worn tread reduces traction in wet grass. When selecting a replacement, choose a tire with the correct diameter, width, and load rating for your mower, and verify that the wheel hub and axle are compatible with your model. In 2026, routine inspection remains the cheapest, most effective maintenance step. The lawn mower tire and wheel combination is central to safe mowing, so address issues promptly.
Common tire problems and symptoms
The lawn mower tire and wheel system can show problems in several predictable ways. A punctured or flat tire leads to poor traction and wobble, especially on uneven turf. Cracked sidewalls or bulges indicate structural failure and risk a blowout during operation. Excess wear on the tread reduces grip in wet grass and increases the chance of slipping. Corrosion around the wheel hub or bead can worsen leaks and make removal difficult. If you notice abnormal heat after a run, or if the wheel doesn’t hold air even after sealing, these are signs you should inspect the bead seating and rim for damage. Remember to check both tires and wheels, since a weak tire paired with a damaged wheel can create imbalanced rotation, causing vibration and improved wear on drive components. Regular checks will help you catch wear early and avoid costly downtime. This is where the lawn mower tire and wheel maintenance routine pays off, keeping your mower safe and dependable.
How to inspect tire wear and determine replacement needs
A thorough inspection relies on a few simple checks. Begin by inspecting the tread depth; if the tread is shallow or uneven, the tire may need replacement. Look for sidewall cracks, slices, or exposed fabric; these defects compromise integrity and can fail under load. Inspect the bead seating where the tire meets the rim; a loose bead causes leaks and air loss. Spin the wheel to observe wobble, and test the air pressure with a gauge to ensure it matches the mower’s specification. Mower Help analysis shows that signs like repeated flats, crack lines around the sidewall, and a visibly degraded bead are strong indicators that a tire or wheel assembly should be replaced rather than repaired. For tubed tires, check the tube for punctures or pinhole leaks. Compare the tire’s size with the model’s recommended spec in the owner’s manual and with the wheel’s compatibility. Finally, consider the overall condition of the wheel rim; if it’s bent or corroded, replacement is prudent to restore safe operation. The results of these checks guide your maintenance plan for the lawn mower tire and wheel.
Tools and replacement parts: choosing the right tire and wheel
Before you begin, gather tools and parts that fit your mower’s tire and wheel configuration. Essential items include a socket or wrench set to loosen axle nuts, a tire iron or pry bar for bead seating, a bead breaker if beads resist, a lubricant such as soapy water or tire lube, a tire pressure gauge, replacement lawn mower tire and wheel or a compatible tire, wheel chocks or blocks to secure the mower, and cleaning supplies for rims. Optional items like rust penetrant, rim protector, and a manual or camera to document measurements can save time. When choosing parts, prioritize OEM or model-compatible aftermarket tires and wheels with matching diameter and load ratings. Confirm hub diameter and axle type before purchase; mismatches can result in poor seating and vibration. If you’re replacing a riding mower wheel, ensure the new wheel aligns with the chassis mounting points to avoid interference with the mower deck or drive belt. This planning step reduces returns and ensures a smooth retrofit for the lawn mower tire and wheel system.
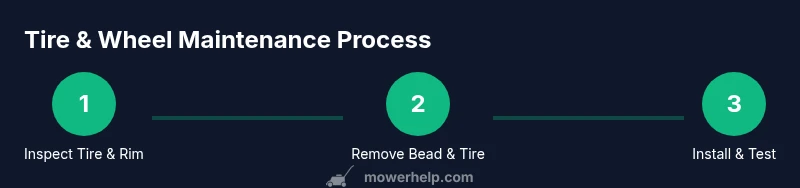
Step-by-step overview: removal and installation (high-level)
This section provides a high-level overview of the removal and installation process for the lawn mower tire and wheel. It’s designed to complement the detailed steps in the STEP-BY-STEP block. Start with safety: disconnect the spark plug or battery, engage the parking brake, and secure the mower on a stable surface. Release air pressure fully before removing the tire, then detach the wheel from the mower. Clean the rim, inspect the bead, and assess rim damage. Install the new tire onto the wheel, verify bead seating with lubrication, and re-mount the wheel on the mower. Reinflate to the recommended pressure, reattach any covers, and test by moving the mower slowly to verify smooth operation. Follow the exact steps for your model and consult the owner’s manual for torque specs. This high-level guide helps you plan the job and avoid mistakes during the lawn mower tire and wheel maintenance.
Balancing, seating, and safety practices
Proper seating and balance are essential for safe, stable operation. After mounting a replacement tire, ensure the bead sits evenly around the rim and there are no pinched areas that could cause air leaks. Use a balance technique appropriate for lawn mower wheels; this might simply be checking for consistent rotation and absence of runout. Keep hands and fingers clear of the wheel during mounting, and never stand in line with the tire as it seats. Use wheel chocks and a stable jack stand or block for support. Confirm the axle nuts are torqued to spec and that any locking devices (such as Loctite or lock nuts) are engaged if recommended by the manufacturer. Regular checks of tire pressure and wheel alignment help prevent uneven wear on the lawn mower tire and wheel and reduce vibrational stress on drives and bearings. Adopting sensible safety practices protects you during maintenance.
Maintenance schedules and troubleshooting
Create a simple maintenance calendar for the lawn mower tire and wheel: inspect monthly, inflate and check seals quarterly, and replace tires when significant wear or damage appears. Keep a log of tire replacement dates and model numbers for quick reference. If you experience frequent flats, investigate the causes—sharp gravel, rough terrain, or curb impact—and adjust mowing routes or upgrade tires with more robust tread. For stubborn leaks, check the rim for corrosion and clean seating surfaces. If needed, reseat the bead with soap/water lubrication and recheck the air pressure. In all cases, avoid over-inflation or under-inflation, as improper tire pressure can distort the wheel and affect performance. Following these steps will help maintain reliable lawn mower tire and wheel performance and reduce downtime.
Common mistakes and quick fixes
- Skipping a full inspection and assuming a tire is fine when the sidewall shows cracks. Quick fix: replace rather than patch. - Over-tightening axle nuts can distort the wheel and cause wobble. Quick fix: re-torque to spec and re-check. - Failing to lubricate the bead during seating can make removal and seating difficult. Quick fix: apply soap/water generously. - Ignoring rim corrosion can lead to leaks; fix by cleaning thoroughly or replacing the rim. - Running a mower with the wrong tire size or load rating can cause poor handling; fix by selecting the correct tire. These mistakes are common but avoidable with careful checks and proper tools.
Tools & Materials
- Socket/wrench set(to loosen axle nuts)
- Tire iron or pry bar(for bead seating and tire removal)
- Bead breaker(optional for stubborn beads)
- Lubricant (soapy water or tire lube)(to ease bead seating)
- Tire pressure gauge(to verify correct pressure)
- Replacement lawn mower tire and wheel(match size and load rating)
- Wheel chocks or blocks(to secure the mower)
- Rim cleaner or rust penetrant(for corroded rims)
- Cleaning rag or brush(prepare seating surfaces)
Steps
Estimated time: 60-90 minutes
- 1
Identify tire size and type
Check the tire sidewall or the mower’s manual to confirm exact size, model, and whether the tire is tubed or tubeless. This ensures you buy compatible parts and avoid seating issues.
Tip: Take a photo of the tire markings for reference when you shop for replacements. - 2
Prepare the mower and safety gear
Disconnect the spark plug (for gas mowers) or the battery (for electric models). Secure the mower on a flat surface with wheel chocks and engage the parking brake before you begin.
Tip: Always wear eye protection and gloves; loosen any deck components if needed before removing the wheel. - 3
Relieve pressure and remove the wheel
Fully deflate the tire, then loosen the axle nuts and detach the wheel from the mower. Support the assembly with a block or jack stand to prevent drops.
Tip: Use a wooden block under the mower frame to prevent damage during removal. - 4
Inspect rim and bead for damage
Examine the rim seating surface for gouges or corrosion and inspect the bead for nicks or cracks. If the rim is bent, replace the wheel rather than risking a poor seal.
Tip: Clean the seating area with a rag; a clean surface helps beads seat evenly. - 5
Install new tire or wheel
Mount the tire bead onto the rim, lubricate as needed, and inflate slowly to seat the bead evenly. Reinstall the wheel onto the mower and torque the axle nuts to spec.
Tip: Lubrication reduces bead seating resistance and protects the rim during installation. - 6
Test and finalize
Reinflate to the manufacturer’s recommended pressure, reattach any covers, and gently test-drive the mower in a safe area to verify smooth operation.
Tip: Check for vibration or misalignment during the test; recheck fasteners if anything feels off.
Got Questions?
What signs indicate a lawn mower tire needs replacement?
Look for deep sidewall cracks, exposed cords, or a bead that won’t seal. If a tire loses air frequently despite repairs, replacement is usually the safer option.
Signs include visible damage, persistent air leaks, and rapid wear. If in doubt, replace the tire for safety.
Can I patch a punctured mower tire?
Patching is rarely recommended for sidewall damage or structural issues. For punctures on the tread surface, patching is sometimes possible, but replacement is often the safer option.
Patching a damaged sidewall is generally not recommended. When in doubt, replace the tire.
Are tubed tires different from tubeless on small mowers?
Tubed tires use an inner tube, while tubeless rely on air-filled beads creating a seal with the rim. Compatibility with the wheel and mower design is key when choosing.
Know your tire type before buying; compatibility with your wheel matters for safe operation.
How often should I check tire pressure on a push mower?
Check tire pressure before each mowing session or at least once per week during heavy use. Keep pressure within the mower manufacturer’s recommendation for best performance.
Check pressure regularly; it helps prevent uneven wear and improves cutting performance.
What’s the best way to store spare tires for a mower?
Store spare tires in a cool, dry place away from direct sunlight to prevent rubber degradation. Keep tires upright if possible and avoid stacking heavy objects on them.
Store tires in a cool spot away from sun and chemicals; keep them in good shape for ready use.
Watch Video
The Essentials
- Inspect tires and rims regularly for wear and damage.
- Choose the correct tire size and wheel for your mower model.
- Follow safe removal and seating procedures to prevent injuries.
- Document parts for easier future maintenance.